ad space 1

Friday 25 July 2014

Back from Kasungu

Hi readers,


photo: Robert Chikombe
I am back from Kasungu. I photographed schools for BuildOn. Interesting NGO: they do adult literacy. Then they make sure the beneficiaries apply the skills, so they get to do business, and keep accounts. And they build the school building to do the literacy in. Then in the morning the regular school children also benefit from the same building. Good job!

Saturday 19 July 2014

Pixels!


 Recently I saw a copy of a magazine that should have been classy. Corporate, for a big company. But even the front page is distorted with pixelation: the photo does not look smooth, but the image consists of little squares. This is not supposed to happen: if a photojournalism student at the Polytechnic submits pixelated work, he/she fails the assignment. This is a very basic concept in digital photography.
Let me explain:
A digital photo is made up of little squares called pixels.
photo 1
Photo 1 looks fine, but if you look at the enlarged section in the blue frame, you can see that the image is built up of squares. Each of these squares gets a colour, and together they build up the image. These squares are called pixels, short for picture-elements. The trick is that the pixels need to be so small that our eyes cannot discern the individual pixels. Then the image looks smooth, and that is what we are looking for. In the printing process the pixels are translated into dots, pixels are square, dots are round. But one pixel translates into one dot. High quality printing on high quality paper uses very small dots, so we see a very smooth image. That means we need many dots to cover a certain area. On cheaper paper, like newsprint small dots would get smudgy, the paper would soak up too much ink and the image does not look good. So on low quality paper bigger dots are used. In a newspaper you can easily see the individual dots, while with high quality printing like the Elle or National Geographic magazines the dots are so small that for my eyes (I am older these days and my eyes are not as good as they used to be!) it is impossible to distinguish the dots, and the whole thing looks very good. Smaller dots means you need more dots for a certain size photo, and that means you need many pixels.
The number of pixels is called resolution. In short: the higher the resolution, the higher the image quality, but also the bigger the file size. The file size is measured in Mb (megabyte), and a hi-res file can easily be more than 30 Mb. Fortunately computer storage space is cheap, with external hard drives of 2 Tb (terra byte) and more, and memory cards of 16 or even 32 Gb (giga byte). So we should not worry about file size too much, unless we need to send an image over the internet. 
Mount Mulanje, high resolution

Mount Mulanje, low resolution.

The panorama photo of Mount Mulanje shows the effect of low-res: the hi-res version is sharp. While the low res version was made the same size, it shows a lack of information by being un-sharp. Now this is internet, where images are always rather low quality, due to the low resolution of a computer screen, and to the need to load pages quickly over the web. A hi-quality file is bigger, so it takes more time to load, which slows down the user experience. With print you don’t have this, and there images on high quality paper can be much, much better quality. So there the difference is even bigger.
If you need a quality image, so for every professional application, you want to use the maximum resolution your camera is capable of. Strangely, some manufacturers do not set the highest resolution as factory settings. So if you want good images, go to the shooting menu of your camera and set the resolution for the highest the camera has, and set the image quality for jpg high, sometimes called jpg fine. Even better is raw, professionals habitually use raw files, which store all the information available, which means the highest image quality. Raw files are bigger than jpgs, the extra file size stores extra image quality. The drawback of raw is that photoshop and other applications cannot work with raw files directly, you need to convert them with (again) photoshop or a raw file converter (to tiff for the best quality, or jpg for smaller files. When you buy a camera, it comes with a disc with software, the raw file converter for your camera is on the disc). This makes your workflow slightly longer but the better image quality is worth it in most cases. I rarely use another file format in my camera. Some cheaper model cameras are slow storing the bigger raw files, so if you are doing action photography, this may be a factor in your decision to use raw or jpg.
It is perfectly possible to make image files small, which is convenient. But the only way to do this is: throwing information away. And once the information is gone, it is not possible to retrieve it. When you save an image in jpg, photoshop gives you a dialogue box with a slider between ‘small file’ and ‘large file’. Large file gives better image quality, and small file gives a smaller file. For professional application I recommend to not go below setting 9. If you need to transfer your images over the internet, services like we-transfer, dropbox, or bigfile.com make it possible to send large files to anywhere on the planet earth. 
low quality jpg
high quality jpg

In the photos you can see Vivian in low quality (quality setting 1), and in hi quality (quality setting 9). Note that in low quality her skin features are not smooth and the background dark grey is in little squares, instead of smooth gradients. Well-paying clients deserve the best quality, and they will not accept images in low quality. (In my opinion we should all avoid low-paying clients, so that the profession is upgraded and we can all make a good living).
If you need to compress an image for transfer over the web, or internet use, it is recommended you keep the large file, that came straight from the camera, in your archive. You may have another client requesting the image for profi use, maybe even a billboard or large banner, and then they need the best quality file.
I recommend not to use the Microsoft Photo Editor or programs like it for any professional use. It is fine for sharing a low quality photo with friends, but too crude for professional use.


Tuesday 15 July 2014

Selfie


These days your privacy works differently than before. You may put a snap up on FB for your friends, and the whole world can see it. Which means: what was meant for your intimate mates may influence your business. Would you want the most beautiful day in your life to be photographed by someone who smacks any kind of selfie on the web, for the whole world to be seen? That is not the kind of approach to photography I would like to see at my wedding.
Your profile pic is the first thing many people notice. So it is important. I had a rough grainy image up, where you can just see that it depicts someone flashing into the camera. I decided to put up something more commercial. Something that tells people what I look like, and how I would like the world to see me.
Black and white, I stuck with that, because it is more “photo” and less an imprint of reality. The photographer has done more to make an abstraction from the face. And I remember those days when we spent many hours in the darkroom to develop our film, and make beautiful prints. It would take you something like 5 minutes to see what the print is like. And if you wanted something different, you’d have to start over and spend another 7 minutes or so, to see what will come out. And when the print is dry (you develop it in liquids) it looks different, so after waiting an hour for it to dry you may have to redo it anyway. This takes seconds, these days. (Well, some of these photo studios print your photos differently from what you had in mind: they have software, that automatically adjusts your photo to something a programmer in the factory thinks is what the average person will want to see, not what you had in your artistic mind….) But those days of the darkroom are over, most photography is digital these days. Anyway, I decided to us black and white. A headshot, because these avatars are small, and if you put more then a face there, it will come out so small it does not tell the viewer what I look like.
Straight on, a kind of standard approach. Again, you could be very artistic, but on 180x180 pixels you have very little space to do so. And that means your artistic vision may get lost. Better to be conservative, and go for a face. I lit it from the front, with an umbrella. A few years ago, most portraits took three lights, but I find beauty in simplicity these days. Also, if you photograph someone who is not used to this kind of work, a lot of equipment may be intimidating, and cause your subject to be stiff in the photo. While one stand with an umbrella is something most people can get used to in a couple of minutes. And with one light, you have less technical stuff to worry about, so you can concentrate on the subject.
In this case the subject is me, the angle is decided, one light, slightly to the (camera) right, so on the left you see a bit of shadows in my face, which nicely shows the shape of my head. Dark background, so I jump out at you, but not flat black, that would make my head float in space, like an astronaut in a science fiction film. I want it to be grounded. If I wanted the background flat black, I would make more space between the subject and the background so the light is further away from it, and I would flag the light to block any light falling on my background. This background is painted wood, if you use black velvet, it will be much darker.
Now sharpness: I want to appear sharp in my profile pic, to not give the viewer the mistaken idea that I am careless about the technical quality of my work. Some people may have hi-tech equipment, like an app that you can see the photo you are about to make on your i-Phone. Very helpful, but I don’t have that level of hi-tech. So I placed an unused light stand where I would be standing, with the top at my eye level. I focused on that, and activated the self timer. I stepped in the place of the stand, and the photo was made. Inevitably, I found that my ear was sharper then my eye. For a standard portrait you focus on the eye. If the head is at an angle from the camera, you usually focus on the eye closest to the camera, but you may want to focus on the eye further away from the camera. Your choice. In this case the eyes are at about the same distance, and I redid the pic, making sure now my eyes were where the stand was, so that the focus would be on my eye. Almost right this time, good enough for a low res profile pic.
Exposure: I checked the histogram of the first photo and you see it is almost totally on the left side.
1
2
(photo 1) That is underexposure. I want a dark background, but my face should be bright (I am Caucasian, for African skin you would want more to the left to be realistic). So I increased the flash output by a full stop (from ¼ to ½) Now it came out good. You see that there is more on the left, because of the dark background and the dark sweater that I am wearing but there is information almost all the way to the right. You would not want flat whites in this photo, that would be too bright and take the colour out of my skin. (Usually flat whites are not nice. If you have them in clothes like a wedding dress, you lose the structure of the material. And the bride has chosen that dress with care, she wants to see the material in the photos. Sometimes you get prints with flat whites in the wedding dress. This is not the way it should be. Often wedding photos should be low contrast. That also adds to the romantic feeling and gives smooth skin.)
But my expression: from all that technical hullaballoo I was looking too serious and troubled. I should be looking interested, relaxed, but serious. It should not say: I am a party animal who has so much fun at your wedding that I forget the photos. It should say: I am serious about this photo, as I am serious about the work I make for you. So I tried a few more. One was too smily, one was out of focus, one was not quite right, though I don’t really know what the problem is. And then one came out that I think is good. This one shows me, the way I would want you to see me.
I took it through photoshop: I made the shadows a bit bluish, and the highlights a bit yellowish. That way it gets a bit of depth: the sunlit parts of a colour photo are a bit yellowish, and the shadows are lit by the blue sky, which makes them bluish. Then I decided to add a red border, to lighten the mood a little, and give it more attention value. Red is a very strong colour: in nature there are only small areas of pure red, like flowers. This in contrast to the vast blue sky and green foliage. In the dry season there is a lot of brownish yellow. So our eye is used to a lot of these colours. But since red only appears in small areas, it attracts a lot of attention. It may help someone notice my profile. (this phenomenon can also cause problems: in a colour photograph, a small area of red can attract a lot of
attention, so if it is in the wrong place, like an unrelated background element, you have a problem in your photo)
By the way: if you want to know what lighting was used, often you can see the reflection in the eyes. Here you can see a star-like catch-light, that tells you I used an umbrella.

Thursday 10 July 2014

Reading the histogram


From the reactions to my previous posting I got that I went a bit too fast with the information. So here I come back to the histogram. This is a very important tool for the serious photographer: it gives information on the exposure, and much more than a light meter can.
In situations where we work with available light, the automation of a modern camera gets it right in most cases. Only when we want something outlandish like the photo of Vivianna further down the page, the meter does not understand what we are doing. It will see a lot of black, and decide that the photo is too dark. Then it will compensate, and the photo that comes out is exposed average, which is not what we want, we want something very dark. The same goes for very bright photos like the lake in morning mist on this page, in the opposite way: the automation will make them average, which is darker than we want.
When we use on-camera flash, the flash and the camera communicate. We can put the flash on ttl, and the camera on an automatic mode like P (for program), S (for shutter speed), or A (for Aperture) and the light meter and flash together will calculate an acceptable exposure. A modern camera considers the distance you have focused (it presumes that is the distance you want to have average flash exposure) the available light, and if you use auto-focus it also looks at the area where you have focused, presuming that area should have average exposure. Then it sends out a pre-flash, and meters how much light comes back from this pre-flash, quickly calculates an average exposure and about 1/10 of second later makes the photo. You hardly notice this, but if you observe carefully, you can see that the camera sends out several flashes. The last one is the one for the actual exposure. If you trigger your off camera flash with an optical trigger, the off-camera flash will fire at the first (pre-) flash, which is before you make the photo. So if you use an optical trigger, you must set your on-camera flash on manual. Then it does not use a pre-flash, and your off-camera flash will fire when you make the photo.
Also, the camera’s light meter cannot know how much flash your off-camera flash is going to give. So it cannot calculate exposure correctly in this situation. That means you will have to set the correct exposure manually. For this you make a few test photos, to check the exposure.
histogram
On the lcd screen on the back of the camera you get an impression of the way the photo looks. The image quality there is much less than a computer screen, and a computer screen has much less image quality then a good paper print. So you get only an impression. On top of that, the lcd screen looks different in different available light: in bright light the lcd screen will be overpowered. If you try to see your work in bright sunlight, your lcd screen will not be very clear. You need to move to the shade. If you view your lcd screen in dark circumstances, it will look even brighter. This means, from your lcd screen you cannot judge if the exposure is correct. For this the camera manufacturer has given us a great tool to judge exposure: the histogram. This tells us much more than a light meter does, so digital is much better for off-camera flash than film. (Off course: many photographers with lots of experience have made amazing work with off camera flash on film; digital makes it faster, easier and more user friendly)
The histogram shows the dark tones on the left. If the histogram reaches up high, there are a lot of them, if the histogram is low there are few of them. It does not show where in the photo these tones are, and it does not show colour. If you want to know about the colour, many cameras can show separate histograms for red, green and blue, I will not go into that now, you do not often need those.
I made a photo of two young giraffes. When we look at the histogram, we see that it touches the left side of the diagram at a low level. This means there are a few flat blacks in it. They are in the eyes of both giraffes, in the horns of the front giraffe, and the tail of the back giraffe. These are small areas, so the histogram is low on the left side. The histogram just tapers out on the right, which shows there are few very bright tones in the photo, and no flat whites. The brightest tones are in the white lines on the back, neck and ears of the front giraffe. The histogram is high in the middle, which shows there are a lot of middle tones in the photo. This is a fairly typical histogram.
lake in morning mist
In the photo of a lake in morning mist, you see there are no dark tones. The histogram shows values on the right only, which represent the light tones. The histogram shows the bright character of the photo. If you process the image through photoshop to give it a full range of tones, the feel of early morning mist disappears, and the whole point of the photo is gone. In this case the histogram with values only on the right shows correct exposure.


Vivianna
In the photo of Vivianna on a dark background, the histogram shows values mostly on the left. There is a large black background, and black areas in the pants. It shows some middle tones, which represent the grey floor, the shirt, and the skin. On the right the histogram shows a few values, which are the hi-lights on the side of her face, arm and body. These bright areas are small, so the histogram stays low on the right side.


fishing boat


In the photo of the fishing boat returning in the sunrise, you see most values on the left or the right with few in the middle. This shows a high contrast photo. The values on the left are the black boat and dark water in the foreground. The high values on the right represent the bright sky and bright reflections in the water. The values in the middle are the bluish clouds and the middle tones in the water.
In the next installment I will explain how to use the histogram with off-camera flash.

Tuesday 8 July 2014

Photography lighting: lo-key and hi-key


Hi-key, lo-key, the histogram
When we make photos, we try to communicate our message. We use direct information, usually in the content of the photo. But we also use our visuals to communicate a mood. For this the lighting is very important. Vivian posed for these photos. Thank you, Vivian. Vivian does make up for brides and such, check out her page at: https://www.facebook.com/StyleCastleMalawi?ref=br_tf
When our story takes place at night we want to create the mood of night, when our story takes place in the day we light like day.
1
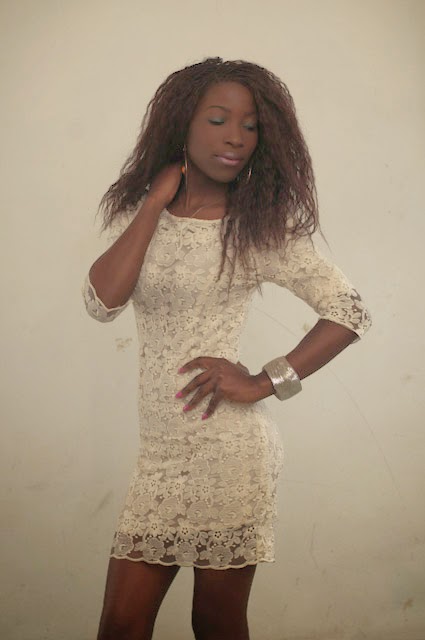
It is not simply a matter of making a photo darker. Photo 1 clearly shows that taking a bright photo with the camera set for dark, is not the solution. This looks like a technical mistake, which is exactly what it is. Here I set up model Vivian with a white dress against a white background, and I underexposed by 3 stops. You see a white dress and white wall rendered in muddy tones, and her face disappears in the darkness. Not good, and not a feeling of night. This photo does not contain any whites, which usually results in a muddy look, rather than a mysterious dark night feel.

For a photo that is set in, for instance, a nightclub, we need to have large areas of dark tones, and small areas of light tones. We call this low key, or lo-key. Most photos, but not all, benefit from having a full range of tones from black to white.
When we make a photo that is supposed to look bright and clear, we use a lot of bright tones, and small areas of dark tones. We call this high key or hi-key. Again, most hi-key photos do benefit from small areas of black, like most lo-key photos benefit from small areas of white.
2
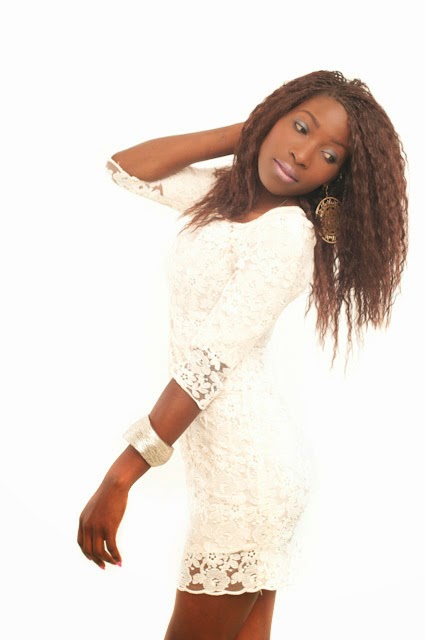
Let’s first look at the set up for a hi-key photo. For photo 2, I asked Vivian to wear white, and put her in front of a white background. This poses interesting question of definition: you want to see the difference between the white dress and the white background. For many hi-key photos a light skinned model, often with blond hair is used, to create lots of light tones. I worked with Vivian for both styles to show the difference, so there are some darker areas of her hair and skin.
To make the background white, I added extra light. It is not possible to light the background and the model the same and get a white background without seriously overexposing the model. If you light them the same, the background comes out grey or the model comes out overexposed. So left and right behind her I put two flashes with umbrellas for even lighting, and aimed them at the background, not at the model. Then I want the whole model to be lit brightly. This is easiest with soft light from a large area, so I aimed a flash at the white ceiling and wall behind the camera. That way I get soft frontal lighting. By including the ceiling I made sure I created some soft shadows under her chin, which gives modeling. If you want the photo shadowless, you would place a large light above the lens and a large light below the lens. Or you can place them left and right. Or just a large white area behind the camera which you light brightly. Notice how you can just see the difference between the white background and the white lace of the dress.  Apart from the styling, hi-key lighting tends to be comparatively simple.
3
4
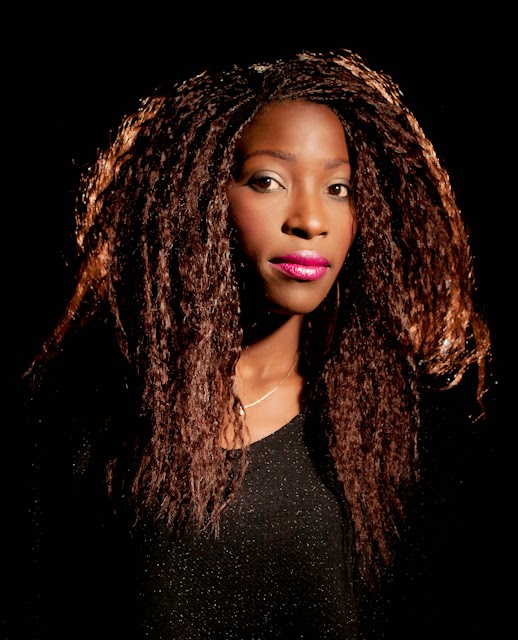
Lo-key lighting tends to be more complex: you have to use light to create a feel of darkness. The styling can help, so for photo 3 I asked Vivian to change to dark colours, and adjust her make up to a night feel. Then I placed her in front of a black background. I started with one light, using a grid. This gives a narrow bundle of light, that only lit her face and arms, I allowed no light on the background or in the shadows. Note that the light areas in her face are normally exposed, they are not darker than in the hi-key photo. But the areas around it are dark, and that gives an interesting combination of the feel of darkness, with a clearly defined face. On the left, her hair disappears into the black background. Often we like to define the shape of the whole head.


The solution I chose in photo 4 was a second light to the left, almost behind the model. I flagged it, so it also gives a narrow bundle of light, and no light hits the background, or spills into my lens. If light that does not contribute to image spills into the lens it can cause lens flare which degrades the image quality. Note how the outline of the hair is defined, but there are large dark areas in the face and under her arms.
5
Another solution to outline the whole face is placing a light behind the model, aiming straight into the hair. This works best with fluffy hair (it is great for an afro!) so she changed her hairstyle for this photo. See how only the outline of the hair is lit. Again large deep shadows with no fill give a night time feel. (it was bright daylight in my studio when we made these photos, I simply overpowered the daylight with my flash.)
When I do photos with off camera flash I usually set my camera for manual exposure: the camera’s inbuilt meter does not know how much flash is coming, so it cannot regulate the light correctly. Then I make test exposures. On my lcd screen I can see how the light hits the subject. (when we were working on film, we needed Polaroid photos to do this, which was expensive and time consuming. Digital is much more user friendly) But the lcd screen is not a reliable tool to judge exposure: when the light around us is bright, the lcd screen looks faint, when the light around us is dark, the lcd screen looks very bright. So it does not show
us correct exposure. For that, I use the histogram. A histogram is a graphic rendition of the distribution of light and dark tones. The dark tones are on the left, all the way on the left is black. The bright tones are on the right, all the way on the right is white. The middle tones are in the middle.
6
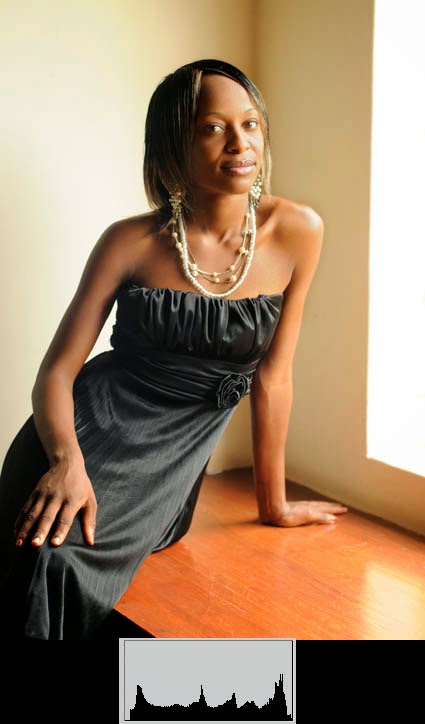
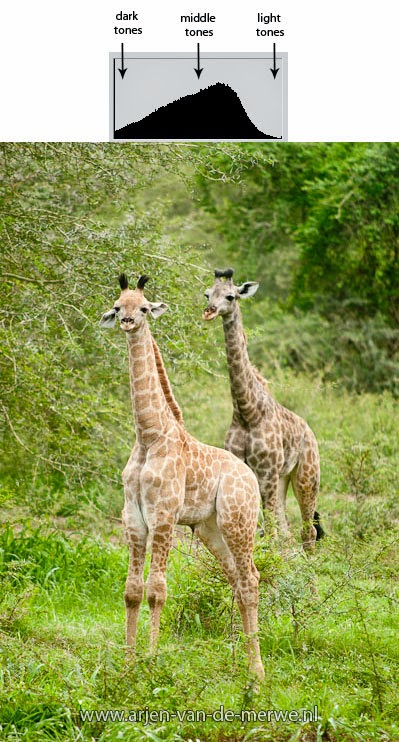
Look at this, more or less average lit, photo 6 of model Lucilia (thank you Lucilia). I put the histogram for this photo on the bottom. You see a more or less even distribution of tones. The histogram shows some tones on the left, some tones in the middle, and some tones on the right. This is medium key.


7
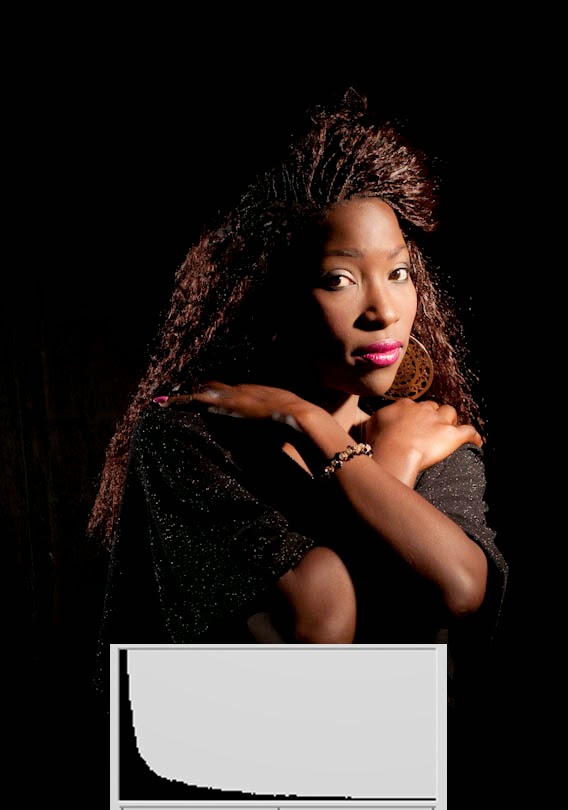
For a lo-key photograph see photo 7. The histogram shows a lot of tones on the left, near black, and few, but some, on the right. These are the small bright areas in the photo.


For a hi-key photograph, the histogram shows a lot of tones on the right. These are the large bright
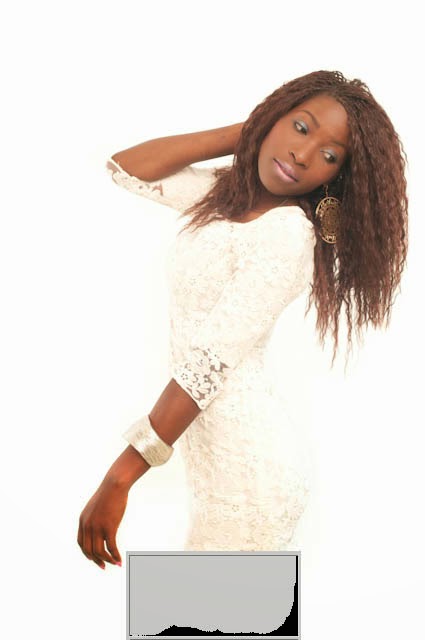
8
areas. It shows few, but some, tones on the left, these are the small dark areas.
To judge exposure from the histogram, you need to know if you are looking for lo-key, and want a histogram with lots of tones on the left, or you are looking for hi-key and want lots of tones on the right. This way the histogram can help you get correct exposure with off camera flash. (The histogram is brought out in different ways on different cameras, to find the correct button, consult your camera manual. Some cheap point-and-shoot cameras do not feature the histogram, and usually their flash features do not favour this kind of equipment. For successful off camera flash, you need more advanced equipment)